Proper Cable Labeling Guidelines
Cable labeling is an essential work. Every cable you installed should be labeled. Because labeling can not only save you lots of time on troubleshooting but also can save the cost of moves, adds, and changes to the system. Labeling network cables is not difficult, but it needs time and patience. Many people seem to ignore this job and don’t know how to do the proper cable labeling. This article will introduce you the detailed information.
Cable Schedule Design and Cable Identification Tips
Before installing cable, you should better prepare a schedule about what kind of cable needed and where the cable to be installed. After finishing cable installation, the schedule can be an installation record to verify that everything was installed and tested, by whom, and when. It can also indicate other necessary information such as the category of cable or termination.
When designing the schedule, note that each cable has an ID. The ID can be numbers, letters, or any combination as long as you understand it and it works. Here are some suggestions about setting ID.
Labeling Efficiency Improvement
As today’s data centers are full of cables, the cable labeling work turns to be more difficult. The following will tell you how to improve labeling efficiency in your data center.
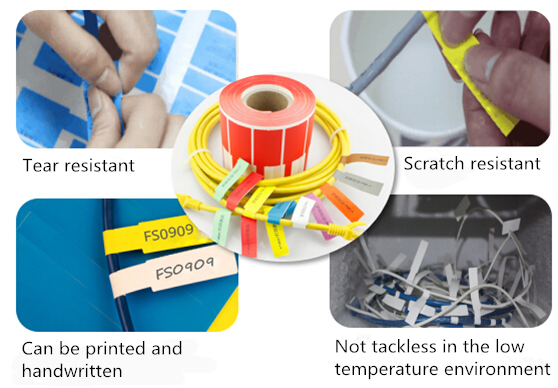
First, choose qualified cable labels & printers from a reliable manufacturer. High quality labels should be waterproof, tear resistant and scratch resistant. Even in the low temperature environment, the labels could still have strong stickness.
Second, label your cables before pulling. Except testing, cable labeling is the most important step in prewire cable installation. You don’t need to label every conductor. If you make 10 pulls into a cabinet, you can just label two conductors in each pull. In that way, you can finish the labeling work in a short time and it’s also easy for other workers to find the right bundle. when all the cables are cut to the proper length for installation and termination, use permanent labels.
Third, use label printers in the panels or other areas with large amount of terminations. Good label printers are easy to use, saving you lots of time to create labels and ensuring the labels line up properly. It will give you a neat appearance.
Cable Label Installation
The last step is to install the cable labels. There are some details to be noticed, otherwise, the labels are likely to be off from the cable.
Step 1. Before cable labeling, clean you hands and cables to ensure the labels sticky enough.
Step 2. Hold the top part of the labels. Make sure there is enough to wrap around the cables.
Step 3. Press the cable labels down with your thumb.
Note: The label should be stuck within 4-5” of the connector, so other workers can find it without having to pull the cable!
Conclusion
Once you finishing cable installation, you know every cable and device. But several days later, you will forget something, not to mention your colleagues. So labeling is quite important to an effective identification program. Proper labeling is helpful to save you time and money. You have to learn how to do proper cable labeling with high efficiency. And one of the necessities for proper labeling is good quality label. FS.COM offers a large variety of labels, including any size, color and shapes, which are easy to install and identify. We also provide custom service to make any type according your requirements.
Source: community.fs
Related products...
fiber-optic-cable
fiber-optic-cable
fiber-optic-cable


[ratings]