


J Hooks for Cable Support Systems
Cable support systems including cable tray, raceway and J Hooks (i.e. J Hook fastens) support cables from the telecommunications room to a work area. Among them, J Hooks are a flexible, efficient and economical solution for support especially when cables are required to install in confined areas that cannot accommodate cable trays or raceways. This post is about the basic knowledge of J Hook since a good understanding of J Hook may help users make the best use of it and get a reliable cabling.
What Are J Hooks?
J Hook, as its name suggested, looks like the letter “J”. It is usually made of galvanized steel or sometimes of plastic polymers, allowing for both indoor and outdoor installation. J Hooks are widely used for cable support because they are easy to reconfigure, offering flexibility, speed and economy in installation. They feature a wide base with smooth, rounded corners to eliminate the potential for snags during installation, while preventing the development of stress points where the cable bundle is supported. In addition, they can maintain the correct cable bend radius which make them less likely to pinch, ensuring the integrity of the cabling systems.
What Are J Hooks Used for?
J Hooks offer an easy-to-install, non-continuous cable support for all types of telecommunication, data and power cabling, such as Category cables (e.g. cat3/cat5e/cat6/cat6a), optical fiber cables and coax cables. In addition, there are some J Hook designed for low voltage and fire protection cabling, meeting the related standard requirement.
Fittings for J Hooks Attachment
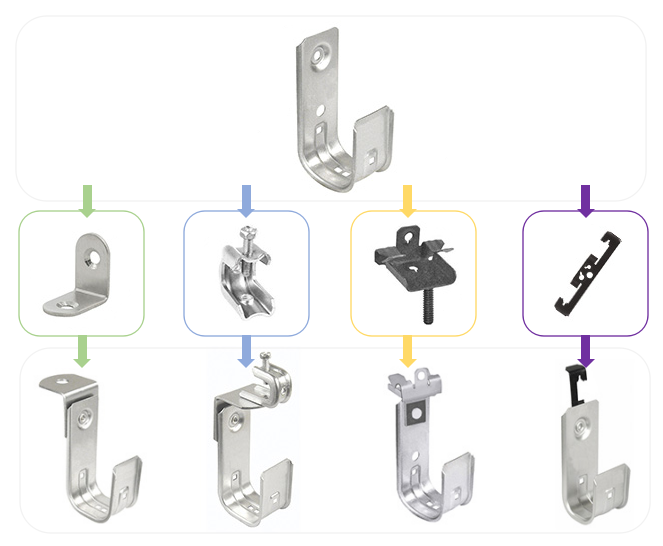
In practical applications, an alone J Hook is uncommon to use. Usually, there are some fittings designed for use to make the J Hooks attach to beams, columns, walls, or the structural ceiling. For instance, several fittings options are available for wall mount J Hook attachment. As shown in the following picture, from left to right, they are angle bracket, beam clamp, hammer-on and wire/rod clip.
How to Install J Hooks?
J Hooks are easy-to-install. With proper attachment fittings, users can greatly reduce installation time for J Hooks. According to some research, the use of J Hooks can yield labor savings of up to 75%. Thus, J Hooks are considered as a preferred alternative to cable tray in some cases. The general installation procedure of J Hooks is as following steps:
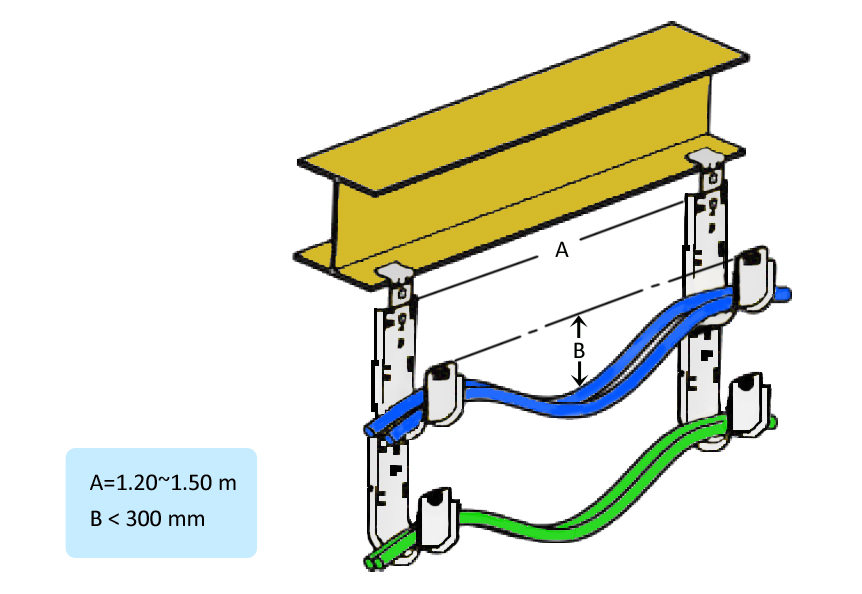
1. Attach the appropriate J Hook to the supporting structure. The fastening intervals of J Hook is about 1.2~1.5 m.
2. Lay the cable in the J Hook. It is a good practice to keep the sag at a maximum of 300 mm.
3. A closure tie prevents cables from slipping. If the J Hook can accommodate a cable tie, use the pre-punched holes in the J Hook fastener to install the tie. But make sure that the cable tie does not put pressure on the cables because this can cause distortion of the cable geometry.
4. Check your installation and ensure that the overall appearance of installed cable should be neat.
Note: Other factors such as pulling tension, bend radius and cable weight, etc. should be considered according to the practical applications. In addition, users can choose custom J Hook trees for multi-media cabling systems.
Conclusion
J Hooks are one of the most cost-effective solution for supporting horizontal cabling, providing a broad base for cable support, reducing stress and bending.
Source: community.fs
Related products...
fiber-optic-cable
fiber-optic-cable
SGCC fiber optic cable 48 core (4*12), single mode Armored OBUC
fiber-optic-cable
[ratings]